layout: page title: “LabVIEW Shortcut Menu Plug-ins” permalink: /lvmenus/
LabVIEW Shortcut Menu Plug-ins
With LabVIEW 2015 came the ability to add custom items to the shortcut menu (aka right-click menu)of front panel and block diagram objects with G code. This allows you you to pimp your LabVIEW editor by adding new menu items, rearranging or replacing existing menu items and manipulating menu items (enable/disable, check/uncheck, …).
The LabVIEW Shortcut Menus are accessible from front-panels and block-diagrams at Edit-Time and only from block-diagrams at Run-Time. At Run-Time, front-panel shortcut menu use another technology you may already known as Runt-Time Menu (.rtm files).
How it works?
At startup, LabVIEW searches and loads LabVIEW Shortcut Plug-ins from LLBs from some specific locations. You have 2 kinds of plug-in folders:
- version-specific: used by this one version of LabVIEW only.
- For plug-ins that affect edit-time front-panel and block-diagram objects use
\resource\plugins\PopupMenus\edit time panel and diagram folder. - For plug-ins that affect Run-Time block-diagram objects use
\resource\plugins\PopupMenus\run time diagram folder.
- For plug-ins that affect edit-time front-panel and block-diagram objects use
- version-agnostic: to share across all versions of LabVIEW.
- For plug-ins that affect edit-time front-panel and block-diagram objects use
\PopupMenus\edit time panel and diagram folder. - For plug-ins that affect run-time block-diagram objects use
\PopupMenus\run time diagram folder.
- For plug-ins that affect edit-time front-panel and block-diagram objects use
If two plug-ins have the same name, LabVIEW will give the priority to the plug-in in the
The anatomy of a LabVIEW Shortcut Plug-in
A Shortcut Menu Plug-in contains 3 main and mandatory components:
- An Affected Items Typedef that specifies which object classes the plug-in operates on.
- A Builder VI, alled when the shortcut menu is built, that adds/modifies/removes menu items.
- An Execute VI, called when the shortcut menu is chosen by the user, that runs scripting code to perform the plug-in operations.
The Shortcut Menu Plug-in has to be saved in an LLB in oder to be loaded by LabVIEW at launch. LLBs allow fast VI hierarchy loading and an easy distribution with a single file.
You can place helpful VIs into the LLB or into a subdirectory (ignored by LabVIEW when searching plug-ins).
Create your own LabVIEW Shortcut Menu Plug-In
Where to start?
When you create a Shortcut Menu plug-in, you will go through 3 steps:
- Specify the objects that the plug-in affects.
- Determine how the custom item appears in the shortcut menu.
- Edit how the plug-in executes when you select the custom item.
LabVIEW offers an utility to guide us creating new Shortcut Menu plug-ins.
Open the
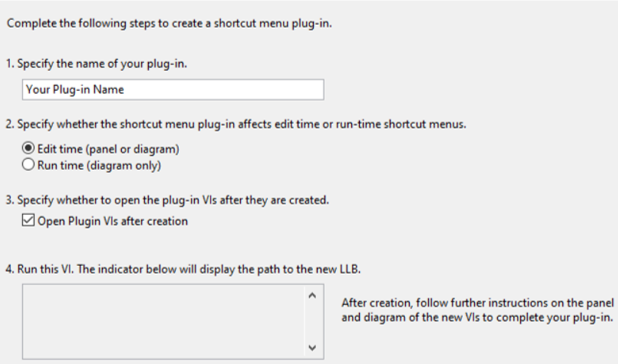
You have to enter the name of your plug-in, specify whether the shortcut menu plug-in affects edit time or run-time shortcut menus, and optionnaly check/uncheck Open Plugin VIs after creation, before running the VI.
This utility generates the LLB, with the 3 main components of a Shortcut Menu plug-in, correctly named and to the proper folder.
Let’s use a real-life scenario as an example of the LabVIEW Shortcut Menu plug-in creation process. Imagine we want to implement a Shortcut Menu plug-in, called myPlugIn, that will change the background color of Numeric controls and Numeric constants.
Affected Items
First we specify which front-panel or block-diagram objects our shortcut menu plug-in operates on by editing the Affected Items control.
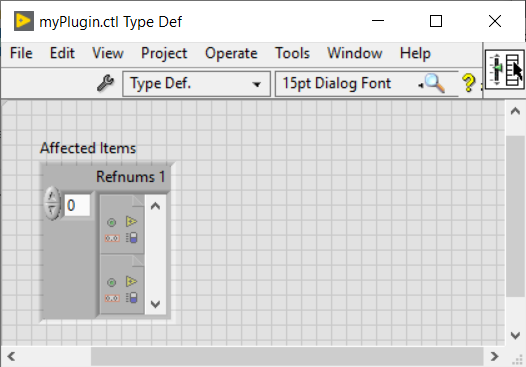
This Typedef contains a cluster of VI Server Refnum Arrays that represents the selected objects of that type. You can add an object by adding an array of a refnum type, remove an object by deleting an array, or choose a different object by right-clicking an array » “Select VI Server Class” and selecting the refnum type you want under the Generic hierarchy.
To meet our myPlugIn requirements, the Affected Items should have 2 arrays, one for the Numeric Control objects and one for the Numeric Constant objects. Then, we have the following Typedef:
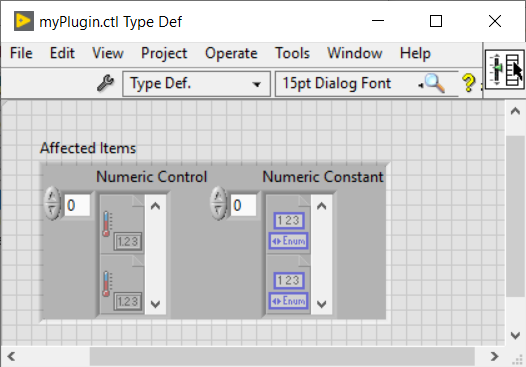
Based on the object types defined in the Affected Items, LabVIEW runs a specific set of VIs on a given right-click. In our case, our Builder VI will be called on a right click on front-panel numeric controls and on block-diagram numeric constants.
:bulb: Note
- You can disconnect the “Affected Items” from the typedef to make the plug-in load faster. The typedef is only there to assist you in keeping this VI and the execution VI using to the same type.
- Only include the most specific classes your plugin affects.
Builder VI
Now, we have to tell LabVIEW which items to add to, or toggle, or remove from the shortcut menu.
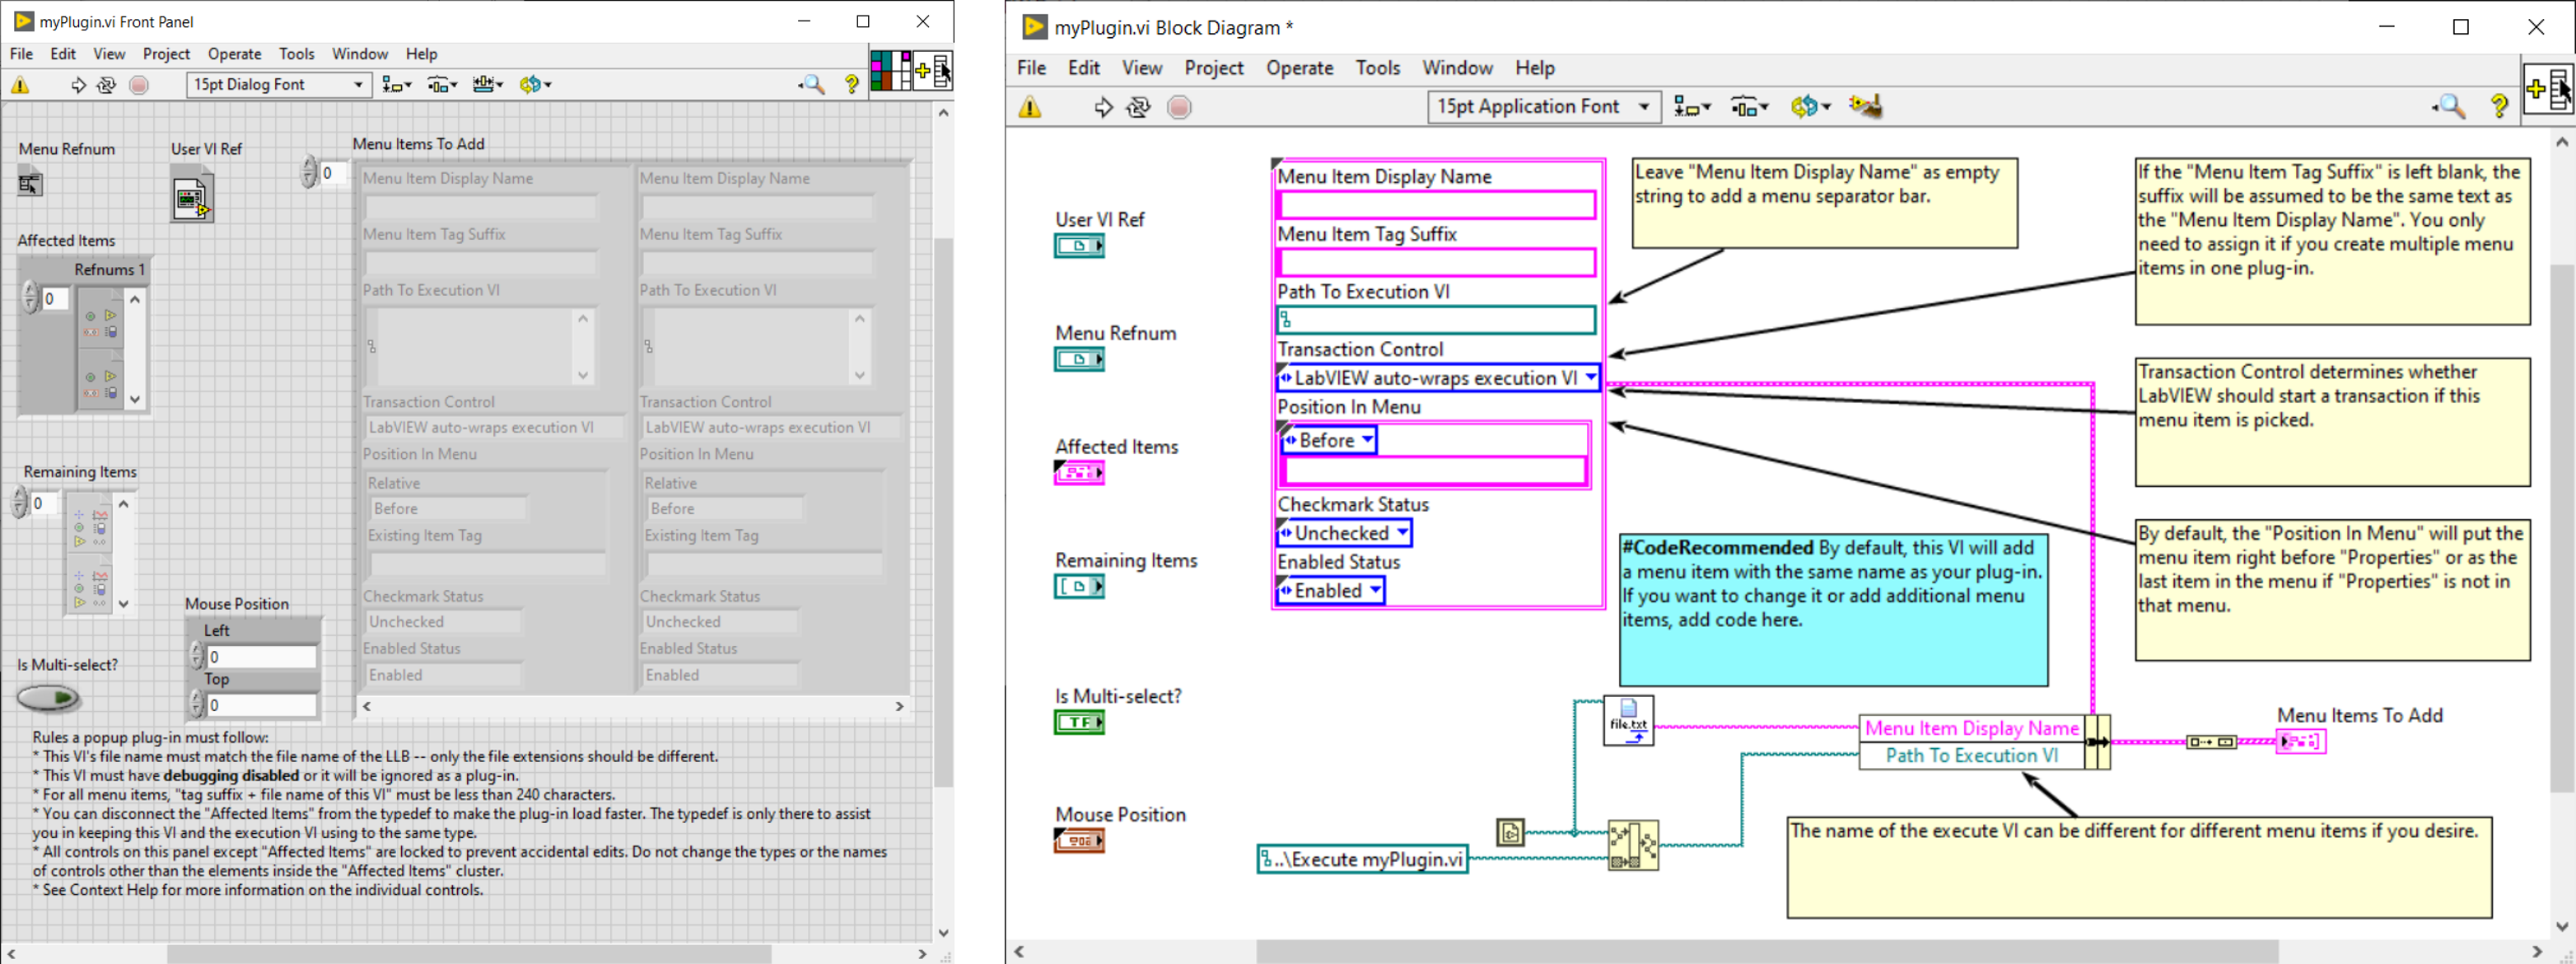
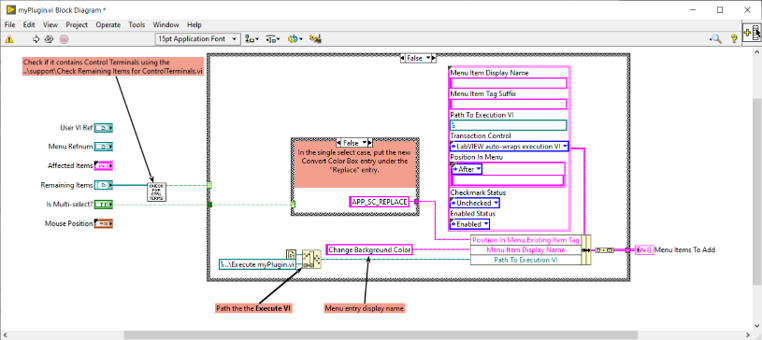
In the Builder VI each menu item is described by :
- Menu Item Display Name: is the text displayed in the right-click menu. If left empty it adds a menu separator bar. By default, the Item Display Name is the Builder VI name without the file extension. Let’s change it to “Change Background Color”, that helps the end user to know what expect when selecting this item.
- Menu Item Tag _Suffix__: is used we you assign multiple menu items in one plugin.
- Path To Execution VI: is the VI that LabVIEW will launch if the end user select this entry.
- Transaction Control: tells to LabVIEW to weither or not add an Edit > Undo option for the operation made, when the item is selected, in the user VI.
- Position In Menu: indicates where (Before, Instead of, After, Into Submenu), relatively to the specified menu item tag, you want your menu item to appear. By default, the menu item will be right before “Properties” or as the last item in the menu if “Properties” is not in that menu.
- Checkmark Status: specifies whether to enable or to dim the selected menu item on the menu.
- Enabled Status: specifies whether to place a checkmark next to the menu item on the menu.
You get information about the user selection with the VI inputs:
- User VI Ref: refnum of the VI on which the user right-clicked.
- Menu Refnum: refnum to the shortcut menu for the Affected Items.
- Affected Items: list of objects that the plug-in affects, from the user selection.
- Remaining Items: list of all othe objects from the user selection.
- Is Multi-select?: indicates if the user has selected a single object or multiple objects.
- Mouse Position: coordinates where the user clicked.
You can implement some logics based on the user selection information to tell LabVIEW which shortcut menu items to add to the menu.
Back to our example, using the following rules:
- If this is a single object selection, the menu item will be under the “Replace” entry.
- If this is a multiple object selection, it will be under the “Visible Items” entry.
- If the user selection contains Control Terminals we don’t want to show the menu item.
:warning: Caution
- Do not modify the controls that are assigned to connector pane terminals. To load and execute plug-ins, LabVIEW requires these predefined control names, types, and terminal positions.
- This VI’s file name must match the file name of the LLB – only the file extensions should be different.
- This VI must have debugging disabled or it will be ignored as a plug-in.
- For all menu items, “tag suffix + file name of this VI” must be less than 240 characters.
:bulb: Note
- Make sure the builder VI is light-weight to avoid shortcut menu loading time.
- If your menu item launches a dialog, end the menu item text with “…”
- All controls on this panel, except “Affected Items”, are locked to prevent accidental edits.
- Builder VIs stay in memory after first run:
- Global VIs can be used to persist data between plugin runs.
- Global VIs can also share data between the builder VI and the execute VI.
- As Debugging tools (probes, breakpoints, etc.) cannot be used in the Builder VI, use Log to file, One Button Dialog, Debug Write.vim, etc, instead.
Execute VI
Let’s dive into the final step and define actions that LabVIEW performs when you select a custom item from the shortcut menu.
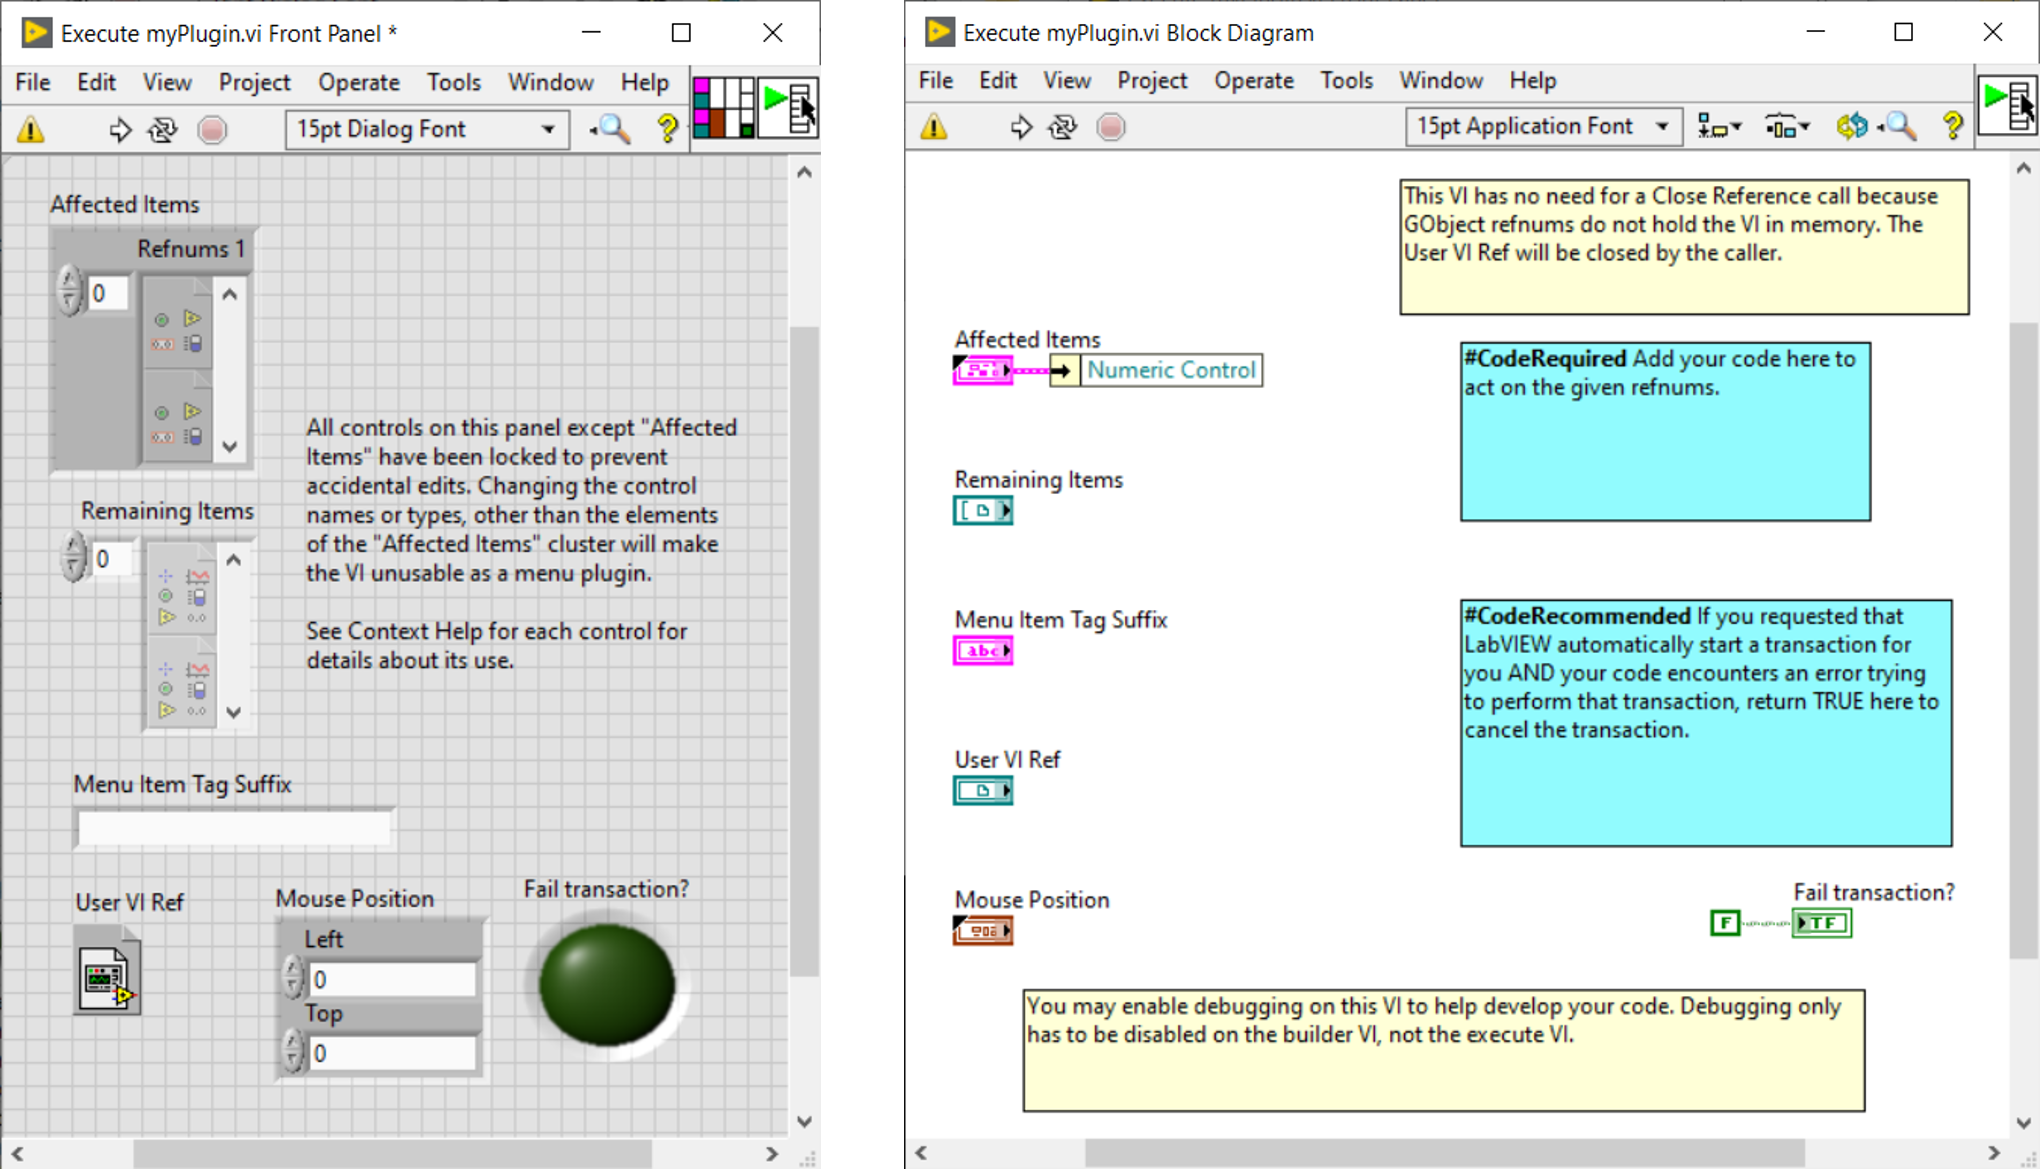
As discussed above, LabVIEW loads context menu plug-ins on startup, so you have restart LabVIEW for the changes to take effect and see your your Shortcut Menu Plug-In.
:warning: Caution
- Be careful reading the Data Type property: there is a potential issues reading data types across Application Instances. If you need to read a data type, do it in the owning VI’s Application Instance or use Request Deallocation.
:bulb: Note
- Make sure the builder VI is light-weight to avoid shortcut menu loading time.
- All controls on this panel, except “Affected Items”, are locked to prevent accidental edits.
- Debugging tools can be used in the Execute VI.
- It is possible to reload plug-ins without restarting LabVIEW, invoking the Menus:Refresh method. You can find the
\resource\plugins\PopupMenus\support\Refresh Menus.vi which does exactly that!